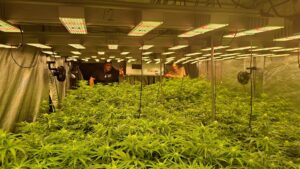
The harvest is the moment months have been building toward. Anyone completing their first homegrow quickly realizes: cutting down the plant is just the beginning. Harvesting, drying, and curing cannabis are three consecutive processes that determine the final quality of the buds – flavor, aroma, potency, and shelf life. Make mistakes here, and you squander the potential of your entire harvest. Do it right, and you’ll have pharmacy-quality flowers.
📑 Inhaltsverzeichnis
- When is Cannabis Ready to Harvest? The Most Important Harvest Indicators
- Harvesting Cannabis: Step-by-Step to Proper Harvest Technique
- Drying Cannabis: Temperature, Humidity, and the Right Environment
- Curing Cannabis: Why Fermentation is Key to Peak Quality
- Common Cannabis Drying and Curing Mistakes – and How to Avoid Them
- Optimal Storage: Keeping Your Harvest Fresh Long-Term
- 💬 Fragen? Frag den Hanf-Buddy!
This guide walks you through all three phases step by step: from the first harvest indicators through optimal drying to professional curing in glass jars. It doesn’t matter whether you grew indoors or outdoors – the basic principles apply to both methods.
When is Cannabis Ready to Harvest? The Most Important Harvest Indicators
The question of proper harvest timing is one of the most frequently asked – and simultaneously one of the most important. Harvest too early, and the buds lack depth and potency; the terpenes aren’t fully developed. Harvest too late, and CBN-containing, already-degraded cannabinoids dominate, leading to a heavier, often sedating effect. For most strains, the harvest window spans just a few days to maximum two weeks.


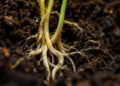
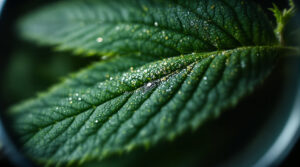
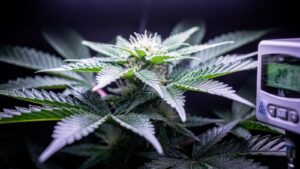
The most reliable way to determine harvest timing is through examining trichomes. These tiny, mushroom-shaped glands sit on the flower petals and sugar leaves and produce THC, CBD, terpenes, and other cannabinoids. Using a 60x to 100x magnifying glass or digital microscope, you can assess their maturity. Clear, transparent trichomes mean: too early. They’re still developing, with cannabinoid production in full swing. Milky-white trichomes indicate peak THC content – the ideal time for a physically-cerebral, energetic effect. Amber-colored trichomes signal THC degradation to CBN, which produces a stronger sedating, body-focused effect.
Many experienced growers aim for a mix of 70–80 percent milky and 20–30 percent amber trichomes – this delivers a balanced, full effect. For medicinal purposes, it can make sense to wait a bit longer to increase the proportion of sedating cannabinoids.
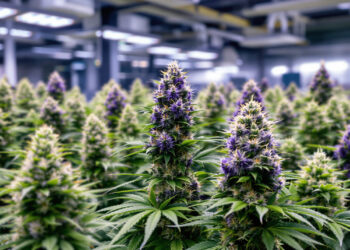
Beyond trichomes, there are other visual cues indicating harvest readiness: buds stop producing new white pistils while existing pistils turn orange, red, or brown. With many strains, 60–90 percent of pistils take on this color when the right time comes. Additionally, the calyx – the small leaf protecting the seed – swells noticeably, and plant leaves begin to yellow slightly – a sign the plant is mobilizing its last nutrients. More on proper harvest timing can be found in our detailed guide on this topic.
For autoflowering strains, the same criteria apply – though the timeframes are shorter and the harvest window narrower. If you’ve grown autoflowers, check trichomes regularly from week 8 to 10.
Harvesting Cannabis: Step-by-Step to Proper Harvest Technique
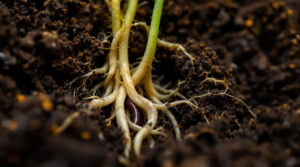
Before reaching for scissors, you should complete one final preparation: flushing the plant. During flushing, water the plant exclusively with clear, pH-neutral water during the last 10 to 14 days of flowering. This washes excess mineral salts and fertilizer residues from the substrate and plant tissue. The result is cleaner, smoother-tasting buds without the typical mineral harshness of unflushed flowers. With soil, flushing is standard; with coco and hydro, many growers also recommend this practice.
The actual harvest begins with sharp, disinfected scissors. Dull blades crush stems and create entry points for mold and bacteria. Ideally, wear protective gloves when cutting – this protects against sticky resin on your hands and prevents skin oils from affecting the trichomes.
There are two basic harvest methods: cutting the entire plant at once – slash it just above the substrate and hang it upside down. This method is quick and suits smaller plants and autoflowers well. Alternatively, stagger the harvest by cutting the upper, most-exposed buds first and letting the lower plant sections mature for another week. Especially with large plants where upper buds ripen before lower ones, this method delivers better overall results.
Trimming happens either immediately after harvest – before drying – or afterward. Both methods have merit. Wet trimming, removing sugar leaves from the fresh plant, is easier and faster since leaves still stand upright and are easily accessible. Dry trimming, trimming after drying, preserves more terpenes since leaves act as a protective layer during drying, allowing buds to dry more slowly.
Drying Cannabis: Temperature, Humidity, and the Right Environment
Drying cannabis is one of the most critical steps in the entire harvest process. Dry too quickly – through direct heat or low humidity – and terpenes evaporate before fully developing. The result is thin-tasting material with a harsh smoke. Dry too slowly, and mold develops, potentially destroying the entire harvest.
The optimal drying temperature ranges from 17 to 21 degrees Celsius. Within this range, terpenes evaporate slowly enough to fully develop their aroma while material dries stably. Humidity should remain constant between 50 and 60 percent. An inexpensive hygrometer costing just a few euros is essential for monitoring these parameters. High room humidity requires a dehumidifier; excessively dry air benefits from a small humidifier.
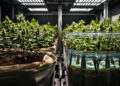
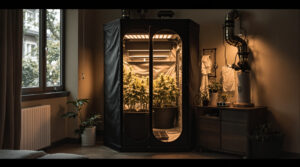
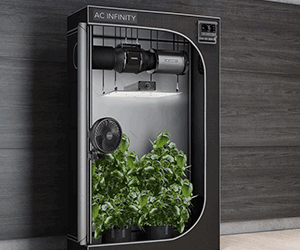
The drying room should be completely light-protected – UV radiation degrades cannabinoids and compromises flower quality. Additionally, slight, constant air circulation is necessary to prevent mold. A small fan not directed at buds provides necessary air movement without overdrying them. Indoor growers can use their own grow tent for this – without lights, but with running exhaust and active ventilation.
Under optimal conditions, drying lasts between seven and fourteen days. The simplest test: a smaller branch should snap audibly when bent. If it remains elastic and bends without breaking, material is still too wet for curing. At ideal drying level, buds feel dry and slightly crispy outside while retaining slight residual moisture inside.
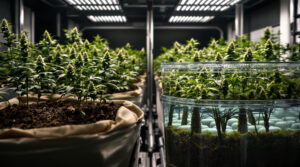
The right growing environment matters here too: indoor growers have significantly more control over drying parameters than outdoor growers. Those growing outdoors must contend with seasonal fluctuations and remain especially vigilant for mold signs. We’ve compiled the overall costs and effort of homegrows – including harvest and drying phases – in our 2026 Homegrow Costs Guide.
Curing Cannabis: Why Fermentation is Key to Peak Quality
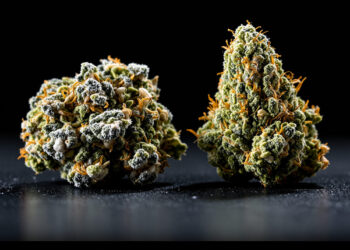
Curing – often called fermentation in German-speaking regions – is the final and most frequently underestimated step in harvest processing. Dried buds are stored in airtight containers under controlled conditions. This phase lasts between two and eight weeks, and the taste differences between two and eight weeks of curing are striking.
During curing, multiple biochemical processes occur simultaneously. Remaining sugars and chlorophyll break down, eliminating the characteristic „grassy“ smell of fresh buds. Simultaneously, enzymes release additional terpenes and convert some cannabinoids into more stable forms. The result is significantly rounder, more complex flavor and smoother smoke.
Glass jars with rubber seals – such as Weck or Mason jars – work best as containers. Glass is odor-neutral, airtight, and doesn’t react with cannabis. Plastic containers, regardless of quality, are unsuitable long-term – they can emit odors and allow minimal gas exchange that compromises aroma. Jars should be filled to about 75 percent capacity, leaving enough air without excessive oxygen.
For precise humidity control, Boveda packs or comparable humidity-control pads with 62 percent relative humidity are recommended. These automatically regulate jar humidity: releasing moisture when cannabis is too dry, absorbing it when too wet. This is particularly valuable for beginners, as humidity control during curing without such aids requires considerable experience.
During the first two weeks, jars must open daily for 15 to 30 minutes – so-called „burping.“ This gas exchange replaces humid, CO₂-rich air with fresh air. Simultaneously, excess moisture and developing gases escape. An unpleasantly damp or ammonia-like smell when opening the jar signals a warning: material was still too wet for curing and must be removed immediately for further drying. Mold at this stage is rare but possible – and then it can contaminate the entire jar.
After two weeks, burping can reduce to two or three times weekly. After four weeks, quality is already noticeably better than freshly dried material. After six to eight weeks, buds reach peak quality: complex aroma, smooth smoke, maximum terpene presence. Those managing to wait longer – the hardest discipline in homegrows – are rewarded with flowers matching professionally produced medicinal cannabis. Learn more about curing basics in our comprehensive curing guide.
An important pre-harvest decision concerns darkening the plant. In the last 24 to 48 hours before harvest, plants can be kept in complete darkness. Some growers swear this final darkness stimulates trichome production and increases bud resin content. Scientifically, this effect isn’t conclusively proven, but it doesn’t hurt in practice. What is clearly established: darkness lowers sap flow in plants, slightly easing drying.
Two basic drying methods exist. The most common: hanging branches or entire plants upside down from twine or netting. Natural gravity keeps buds in shape, and sap flow in stems slightly slows drying – good for quality. The second method uses specialized drying nets: dried buds placed directly on horizontal nets. This saves space but risks pressure marks on buds and uneven drying. Drying nets suit already-trimmed buds particularly well.
One often-neglected aspect of cannabis drying is the difference between indoor and outdoor harvests. Outdoor growers often battle changeable autumn conditions: rain dramatically increases mold risk, and temperatures below 15 degrees Celsius can slow drying. With poor weather, outdoor harvests should immediately move indoors to a climate-controlled drying room. Bud washing – removing buds in chlorine-free water with baking soda and citric acid – is a method especially used after outdoor harvests, removing dust, pollen, and mold spores before hanging to dry.
Common Cannabis Drying and Curing Mistakes – and How to Avoid Them
The single most common drying mistake is excessive speed. If someone dries freshly harvested buds under heat lamps or in an oven at low temperatures to finish faster, they destroy much of their harvest’s aromatic potential. Terpenes are volatile compounds that evaporate with heat – taking flavor with them.
Another classic mistake is inadequate air circulation during drying. Without sufficient air movement, mold develops on damp areas – especially inside large, dense buds – invisibly starting inside. An early warning sign is a sweet, musty smell, distinct from fresh cannabis. Opening a dense bud reveals gray or white threads: that’s Botrytis, feared gray mold. Affected material must be immediately and completely removed.
With curing, the most common mistake is placing cannabis in jars too early – while still too wet. The „snap test“ on branches is crucial here. Going into jars too early risks mold even with regular burping. Also, jars should never be stored in sunlight or near heat sources – constant, moderate temperatures between 18 and 22 degrees Celsius are ideal. Basement storage often works perfectly.
Finally, many beginners underestimate the time factor. Those considering material finished after two weeks of curing miss actual quality improvement. Cannabis cured four to eight weeks substantially surpasses freshly dried product in nearly all quality metrics – patience is worth it.
Optimal Storage: Keeping Your Harvest Fresh Long-Term
After curing comes long-term storage. Dried cannabis’s enemies remain the same as during curing: light, heat, oxygen, and humidity. Control these four factors, and qualitatively superior cannabis stays fresh for months – under ideal conditions even over a year – without significant quality loss.
Glass containers already used for curing suit long-term storage equally well. They should be kept in a light-protected, cool area. Those storing harvest over several months can vacuum-seal glass or use oxygen absorbers reducing oxygen content to minimums. For very extended storage – over six months – deep-freezing in well-sealed, vacuumed containers works, though material must be completely dry since ice crystals damage trichomes.
A final quality-control tip: those using Boveda packs in storage jars should check them regularly. When they harden, they’re exhausted and need replacement. So long as they remain soft and flexible, they reliably regulate humidity.
Wie trocknest du deine Cannabisblüten nach der Ernte?
FAQ: Harvesting, Drying, and Curing Cannabis
When is my cannabis ready to harvest?
The most reliable indicator is trichome appearance under a magnifying glass or microscope. Milky-white trichomes signal peak THC content and thus optimal harvest timing for full, balanced effects. Amber trichomes show THC already converting to CBN, producing stronger body-focused effects. As additional indicators, discolored pistils help: when 60 to 90 percent turn orange or brown, buds are typically harvest-ready.
How long does cannabis drying take?
Under optimal conditions – 17 to 21 degrees Celsius and 50 to 60 percent humidity – drying typically lasts seven to fourteen days. Small branches should snap audibly when bent. If material still bends elastically, it’s not dry enough for curing. Avoid rapid drying under heat or low humidity since valuable terpenes are lost.
What is curing and why is it important?
Curing (also fermentation) means controlled post-ripening of dried buds in airtight glass containers. During curing, chlorophyll and sugars break down, responsible for fresh buds‘ „grassy“ taste. Simultaneously, terpenes release and cannabinoids stabilize. Results include significantly more complex aroma, smoother smoke, and improved overall effects. Four to eight weeks curing is quality-material minimum standard.
How do I recognize mold during drying and curing?
Botrytis (gray mold) often starts inside dense buds, invisible externally. A sweet, musty, or hay-like smell is an early warning. Opening a dense bud reveals gray or white threads. During curing, ammonia-like odor when opening jars signals excessive residual moisture – material must be immediately removed for further drying. Any mold-infected material must be immediately and completely discarded.
Which containers work best for curing?
Glass containers with rubber seals – such as Weck or Mason jars – are first choice. Glass is odor-neutral, gas-tight, and doesn’t react with cannabinoids or terpenes. Plastic containers, even high-quality ones, suit curing poorly since they enable minimal gas exchange and may emit odors. Jars should be about 75 percent filled and stored in cool, dark, temperature-stable areas. Boveda packs at 62 percent ensure stable humidity.
How long can cured cannabis be stored?
Under optimal storage conditions – dark, cool, airtight, low humidity – quality-cured cannabis stays fresh six to twelve months. For very extended storage beyond a year, vacuum-sealing or frozen storage works well. With proper storage, cannabinoids degrade only minimally, while terpenes respond more sensitively to temperature fluctuations and light. Regularly checking Boveda packs for exhaustion is advisable during extended storage.
During curing, some ask whether material needs further post-treatment. The answer is clear: no. Cannabis once properly cured needs no further treatment. Later adding terpenes or artificial flavors destroys what was painstakingly built. Natural quality develops through growing, harvesting, drying, and curing – not afterward.


Branchen-Update
News, Analysen und Reportagen — mehrmals im Monat direkt in dein Postfach.
Folge uns